Why Homemade is Always Best: Elevating Your Desserts
Do you love the idea of a homemade pie or cheesecake but dread the thought of wrestling with a traditional pastry crust? You're not alone. Many home bakers find pie crusts intimidating, yet yearn for that made-from-scratch taste. The good news? Crafting a flawless graham cracker crust is not only incredibly simple but also yields a result far superior to anything you can buy in a store. Forget pre-packaged, often stale, and flavorless shells; a homemade graham cracker crust is a game-changer for your dessert repertoire.
The allure of a homemade graham cracker crust lies in its unmatched flavor and texture. Unlike its store-bought counterparts, which often taste bland and crumble too easily, a freshly made crust offers a rich, buttery crunch that perfectly complements a vast array of fillings. It's robust enough to hold up to dense cheesecakes and creamy pies, yet delicate enough to melt in your mouth. This versatility makes it an indispensable tool in any baker's arsenal, transforming everyday desserts into extraordinary culinary experiences.
Imagine the delightful aroma filling your kitchen as you prepare this simple foundation. Whether you're making a zesty Key Lime Pie, a decadent chocolate tart, or a luscious no-bake cheesecake, the quality of your crust sets the stage. A homemade crust provides not just a base, but an integral layer of flavor and texture that elevates the entire dessert. It’s an easy, impressive way to add a personal touch that guests will undoubtedly notice and appreciate.
The Simplicity of Ingredients: Your Pantry Powerhouse
One of the most appealing aspects of a simple graham cracker crust recipe is the minimal ingredient list. You only need three common pantry staples to create this perfect foundation. This simplicity ensures that you can whip up a crust whenever inspiration strikes, without needing a special trip to the grocery store.
Graham Crackers: The Foundation
The star of our show, graham crackers, provides the signature flavor and texture. You have a couple of options when sourcing your crackers:
- Whole Graham Crackers: Buying whole sheets tends to be more economical. You'll need to crush them yourself, but this allows for better control over the crumb consistency. For a standard 9-inch pie plate, you'll typically need around 10 to 11 full rectangular sheets to yield approximately 1 ½ cups of crumbs (which is about 170g). Be aware that graham cracker sizes have subtly changed over the years, so it’s always best to measure by volume or weight rather than just counting sheets.
- Pre-Crushed Graham Cracker Crumbs: For ultimate convenience, you can purchase pre-crushed graham cracker crumbs. While slightly more expensive, they save you a step.
Expert Tip: Regardless of your choice, opt for a good quality, name-brand graham cracker. The flavor difference is noticeable and contributes significantly to the overall taste of your crust.
To crush whole graham crackers, you have two primary methods:
- Food Processor: This is the fastest and most efficient way to achieve uniform crumbs. Simply pulse the crackers until they reach a fine, sandy texture. Be careful not to over-process them into a powder; you want a texture akin to coarse sand.
- Rolling Pin and Plastic Bag: For a more hands-on approach or if you don't have a food processor, place crackers in a sturdy freezer bag and use a rolling pin to crush them. This method can be quite therapeutic and yields equally good results, though it might take a little longer.
Sweetener: Tailoring the Taste
Sugar is not just for sweetness; it also helps with the crust's structure and caramelization when baked. You have flexibility here:
- Granulated Sugar: The most common choice, it provides a clean sweetness and a slight crunch.
- Powdered Sugar (Confectioners' Sugar): For an even finer, more delicate texture, powdered sugar can be used. It dissolves easily and can make the crust feel a bit smoother.
- Brown Sugar: If you're looking to add a deeper, molasses-rich flavor and a slightly chewier texture, brown sugar is an excellent alternative. It pairs particularly well with fillings like pumpkin pie or apple crisp.
Insight: The amount of sugar can be adjusted slightly to your preference. If your pie filling is very sweet, you might reduce the sugar in the crust, and vice-versa. A good starting point is usually a few tablespoons per 1 ½ cups of crumbs.
Butter: The Binding Agent
Melted butter is the crucial ingredient that binds the crumbs together, giving the crust its structure and rich flavor. It also helps in achieving that delightful golden-brown hue and crispness when baked.
- Unsalted vs. Salted: While many recipes specify unsalted butter for better control over sodium levels, for a graham cracker crust, the difference is often negligible. If you only have salted butter on hand, feel free to use it; you likely won't notice a significant impact on the final taste.
- Melting: Ensure the butter is fully melted before mixing. This allows it to evenly coat all the crumbs, creating a uniform, cohesive mixture. However, avoid using piping hot butter, as it can make the crumbs greasy. Let it cool for a minute or two after melting.
Crafting Your Perfect Crust: A Step-by-Step Guide
Making a simple graham cracker crust recipe is astonishingly quick and straightforward. With your ingredients ready, let's walk through the steps to achieving a perfect crust every time.
Prepping Your Graham Cracker Crumbs
As discussed, the first step is to get your graham crackers into fine crumbs. Aim for a texture resembling coarse sand. This consistency is crucial for the crust to bind properly and to offer that ideal balance of crunch and tenderness. If the crumbs are too fine (like flour), the crust can become pasty; if they're too coarse, it might not hold together as well.
Mixing the Magic
- Combine Dry Ingredients: In a medium bowl, combine your graham cracker crumbs with your chosen sugar. Use a fork to mix them thoroughly. This ensures the sweetness is evenly distributed throughout the crust.
- Add Melted Butter: Pour the melted butter over the crumb-sugar mixture.
- Mix Until Cohesive: Continue mixing with a fork. Many experienced bakers swear by a fork for crumb crusts, as it helps to break up any clumps and evenly incorporate the butter without compacting the mixture too much prematurely. Mix until all the crumbs are moistened and the mixture resembles wet sand. When you press a small amount between your fingers, it should hold together.
Compacting for Success
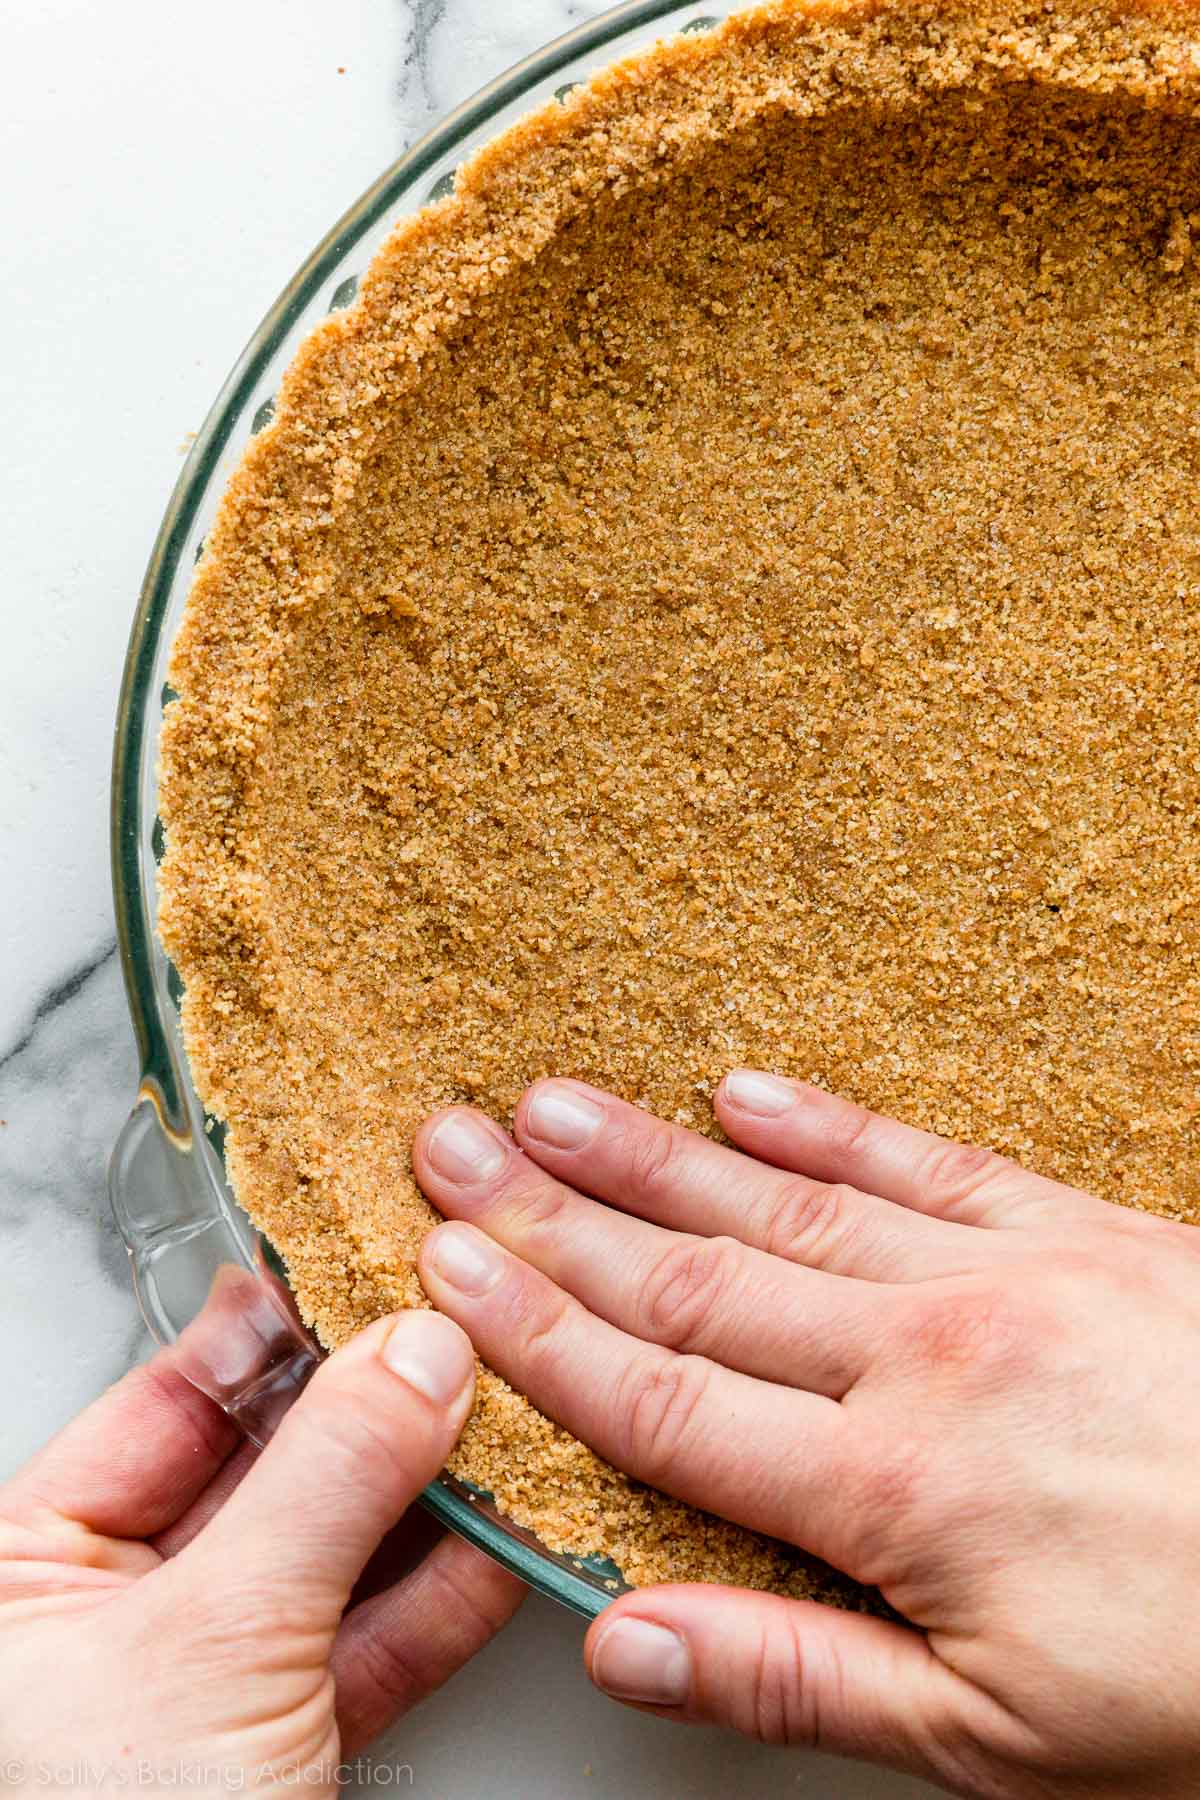
This is arguably the most critical step for a sturdy, reliable crust. The secret to a perfect graham cracker crust is compaction. You need to press the mixture firmly and evenly into your pie plate or tart pan. Don't be shy!
- Start with Hands: Begin by pressing the mixture firmly around the bottom and up the sides of your pan with your fingers. Focus on creating an even thickness.
- Use a Flat Tool: Once you have the basic shape, switch to a flat-bottomed glass or a measuring cup. Use it to firmly press the crumbs into place, especially along the bottom and where the sides meet the bottom of the pan. This creates a dense, sturdy foundation that won't crumble when sliced.
- Even Thickness: Pay attention to maintaining an even thickness throughout the crust. Thicker spots might be too hard, while thinner spots could break apart.
This recipe is typically ideal for a standard 9-inch pie plate. For other pan sizes, like tart pans or individual ramekins, you may need to adjust the ingredient quantities slightly, but the method remains the same.
Baked vs. No-Bake: The Versatility Factor
One of the greatest strengths of a graham cracker crust is its incredible versatility – it can be used for both baked and no-bake desserts.
- No-Bake Applications: For many creamy fillings, such as no-bake cheesecakes, chocolate cream pies, or butterscotch pies, simply chill the compacted crust in the refrigerator for at least 30-60 minutes before adding your filling. This allows the butter to solidify and set the crust, making it firm enough to hold its shape.
- Baked Applications: For pies or cheesecakes that require baking (like a classic New York cheesecake or a chocolate chess pie), baking the crust beforehand offers several advantages:
- Enhanced Crunch: Baking makes the crust extra crisp and crunchy.
- Prevents Sogginess: It creates a barrier, helping to prevent the crust from becoming soggy, especially with wetter fillings.
- Better Structure: A pre-baked crust holds its shape even better and provides a more stable base for subsequent baking.
To pre-bake, place the compacted crust in a preheated oven at 325°F (160°C) for about 10 minutes, or until lightly golden and fragrant. Allow it to cool completely on a wire rack before filling. This cooling step is crucial to ensure the crust sets properly and doesn't crack.
Expert Tips for a Flawless Graham Cracker Crust
While a simple graham cracker crust recipe is inherently forgiving, a few expert insights can elevate your results from good to truly exceptional:
- Not Too Hot Butter: Ensure your melted butter has cooled slightly before adding it to the crumbs. Hot butter can "fry" the crumbs and make the crust greasy.
- Consistent Crumb Size: As mentioned, aim for uniform, coarse sand-like crumbs. Inconsistent sizes can lead to an unevenly textured crust that might fall apart.
- Press, Press, Press: This cannot be stressed enough. The more firmly and evenly you compact the crumbs, the sturdier and more cohesive your crust will be. Use the bottom of a glass to really get into the corners.
- Don't Forget the Chill (or Cool): For no-bake crusts, adequate chilling time is essential for the butter to firm up and bind the crust. For baked crusts, allowing it to cool completely before filling prevents steam from forming and making the crust soggy.
- Customize Your Flavor: Don't be afraid to experiment! Add a pinch of cinnamon, nutmeg, or even a tablespoon of cocoa powder to your crumbs for a unique flavor profile. A chocolate graham cracker crust is fantastic with peanut butter or mint fillings.
- Scaling for Pans: The recipe for a 9-inch pie plate is a great starting point. If using a different size or individual ramekins, remember to adjust your ingredient quantities. A good rule of thumb is to calculate the surface area of your pan and scale accordingly.
- Storage: An unbaked, compacted crust can be tightly covered and refrigerated for up to 3 days, or frozen for up to 2 months. Bake directly from frozen, adding a few extra minutes to the baking time. A baked crust can also be stored at room temperature for a day or two, or refrigerated.
Conclusion
Embracing this simple graham cracker crust recipe is a journey towards effortless baking and superior dessert quality. With just three basic ingredients and a few minutes of your time, you can create a versatile, delicious, and incredibly sturdy crust that far surpasses any store-bought alternative. Whether you opt for a baked or no-bake finish, this crust provides the perfect foundation for cheesecakes, pies, and tarts, adding a homemade touch that truly shines. Say goodbye to pastry crust anxieties and hello to a world of endless dessert possibilities – all starting with the humble, yet mighty, graham cracker crust.
